Spring Core – Phần 9: Autowiring trong Spring, annotation @Autowired trong Spring, các kiểu autowiring
1. Spring Autowiring là gì?
Trong bài Spring Dependency Injection với Object chúng ta đã tìm hiểu khi mối quan hệ giữa các class là has-a (1 đối tượng chứa 1 đối tượng khác) chúng ta sẽ tạo bean cho đối tượng bên trong và truyền nó vào hàm khởi tạo hoặc setter

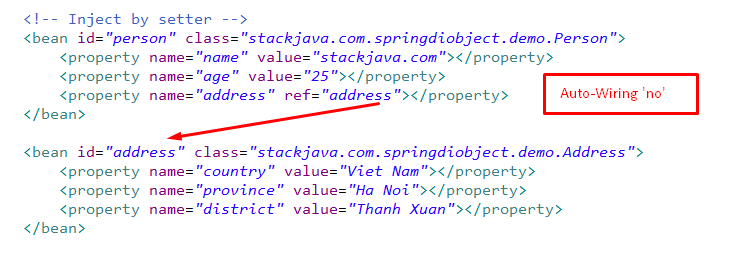
Trong ví dụ trên chúng ta tạo bean ‘address’ cho class Address.java, trong bean ‘person’ chúng ta dùng thuộc tính ref để link tới bean address.
Thực tế thì chúng ta không cần chỉ rõ biến address trong person link tới bean nào, Spring Container sẽ tự động tìm bean thích hợp để inject nó vào. Đó chính là auto-wiring trong Spring.
2. Các loại Auto-wiring trong Spring
Có 5 loại auto-wiring trong Spring.
2.1 Auto-wiring ‘no’
Đây là cách mà chúng ta áp dụng trong ví dụ ở trên. Nó cũng là chế độ auto-wiring mặc định, bạn cần wire (nối) bean thông qua thuộc tính ‘ref’

2.2 Auto-wiring ‘byName’
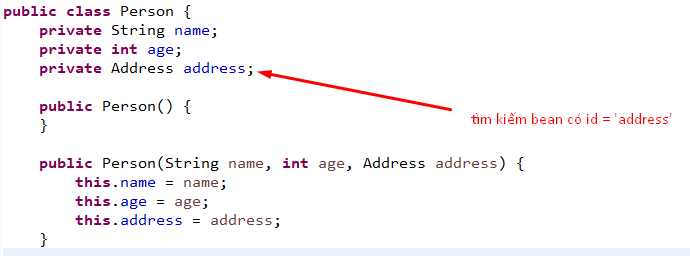
Trong trường hợp này, Spring container sẽ tìm bean có id trùng với attribute Address trong class Person và thực thiện auto wired thông qua method setter. public void setAddress(Address address)


2.3 Auto-wiring ‘byType’
Trong trường hợp này, Spring container sẽ tìm bean có type là Address và thực thiện auto wired thông qua method setter. public void setAddress(Address address)


2.4. Auto-Wiring ‘constructor’
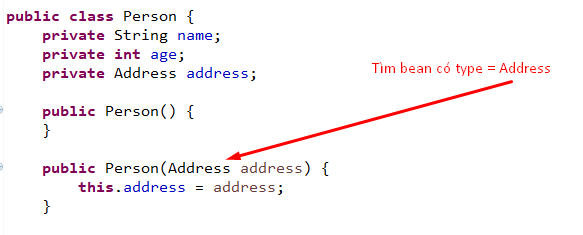
Trong trường hợp này, Spring container sẽ tìm bean có type giống với type của address trong method constructor và thực hiện auto wired thông qua method constructor – public Person(Address address)


2.5. Auto-Wiring ‘autodetect’
Với cách này, Spring Container sẽ thử với auto wired byConstructor, nếu không được thì nó chuyển sang auto wired byType. Tuy nhiên cách này đã không còn sử dụng từ Spring version 3 nên chúng ta không cần quan tâm đến nó nữa =))

3. annotation @Autowired trong Spring
annotation @Autowired biểu thị rằng các thuộc tính sẽ được auto wired:
Ví dụ: để auto wired byType ta khai báo @Autowired ở trước phần khai báo thuộc tính hoặc trước method setter:
@Autowired(required = false)
private Address address;

//hoặc

@Autowired(required = false)
public void setAddress(Address address) {
  this.address = address;
}
Để auto wired byConstructor ta khai báo @Autowired ở trước method Constructor:
@Autowired(required=true)
public Person(Address address) {
  this.address = address;
}
*Lưu ý: thuộc tính required của annotation @Autowired mặc định là true.
- required = true, nếu spring container không tìm thấy bean address để inject vào thì nó sẽ báo lỗi
- required = false, nếu Spring container không tìm thấy bean address để inject vào thì nó sẽ inject null
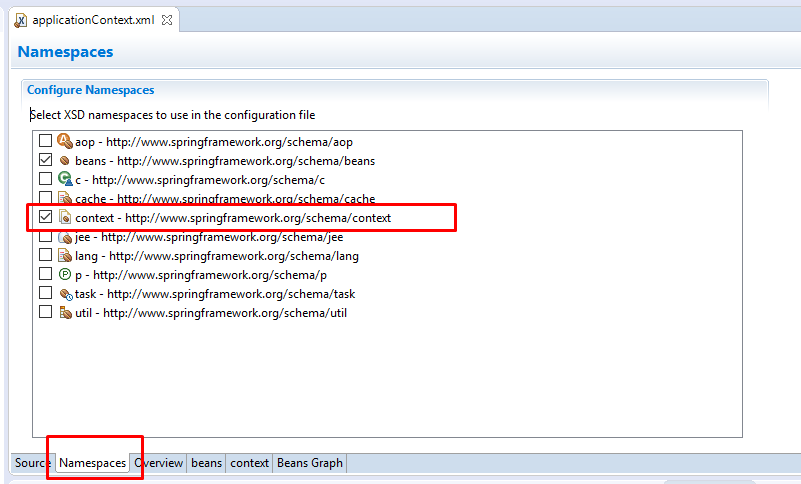
@Autowired là một annotation config của Spring, để sử dụng nó ta phải khai báo thẻ
<context:annotation-config /> trong file config.
(Khai báo namespace: context để sử dụng thẻ <context:annotation-config />)


Demo:
<?xml version="1.0" encoding="UTF-8"?>
<beans xmlns="http://www.springframework.org/schema/beans"
  xmlns:xsi="http://www.w3.org/2001/XMLSchema-instance"
  xmlns:context="http://www.springframework.org/schema/context"
  xsi:schemaLocation="http://www.springframework.org/schema/beans http://www.springframework.org/schema/beans/spring-beans.xsd
    http://www.springframework.org/schema/context http://www.springframework.org/schema/context/spring-context-4.3.xsd">

  <context:annotation-config />
  <!-- Inject by setter -->
  <bean id="person" class="stackjava.com.springdiobject.demo.Person">
    <property name="name" value="stackjava.com"></property>
    <property name="age" value="25"></property>
  </bean>

  <bean id="address" class="stackjava.com.springdiobject.demo.Address">
    <property name="country" value="Viet Nam"></property>
    <property name="province" value="Ha Noi"></property>
    <property name="district" value="Thanh Xuan"></property>
  </bean>

</beans>
package stackjava.com.springdiobject.demo;

import org.springframework.beans.factory.annotation.Autowired;

public class Person {
  private String name;
  private int age;

  @Autowired(required = false)
  private Address address;

  public Person() {
  }

  public Person(Address address) {
    this.address = address;
  }

  public Person(String name, int age, Address address) {
    this.name = name;
    this.age = age;
    this.address = address;
  }

  public String getName() {
    return name;
  }

  public void setName(String name) {
    this.name = name;
  }

  public Address getAddress() {
    return address;
  }

  public void setAddress(Address address) {
    this.address = address;
  }

  public int getAge() {
    return age;
  }

  public void setAge(int age) {
    this.age = age;
  }

  public void print() {
    System.out.println("Person: " + this.name + " Age: " + this.age + " Address: "
        + (this.address == null ? "null" : this.address.toString()));
  }

}
package stackjava.com.springdiobject.demo;

import org.springframework.context.ApplicationContext;
import org.springframework.context.support.ClassPathXmlApplicationContext;

public class MainApp {
  public static void main(String[] args) {
    ApplicationContext context = new ClassPathXmlApplicationContext("applicationContext.xml");
    Person person = (Person) context.getBean("person");
    person.print();

  }
}
Kết quả:
Person: stackjava.com Age: 25 Address: Address [country=Viet Nam, province=Ha Noi, district=Thanh Xuan]
4. Một số lưu ý với Auto wiring trong Spring
- Khả năng ghi đè (Overriding possibility): bạn vẫn có thể chỉ rõ dependency bằng cách sử dụng <constructor-arg> và <property> nó sẽ ghi đè lại autowiring
- Kiểu dữ liệu nguyên thủy (Primitive data types): Bạn không thể thực hiện autowire với các dữ liệu nguyên thủy như int, String…
- Confusing nature: việc autowiring thực hiện tự động, đôi khi nó có thể link tới những bean không tồn tại, nếu có thể thì bạn hãy link nó một cách rõ ràng và dùng required = true để chắc chắn bean được prefer tới có tồn tại.
Okay, Done!
Download code ví dụ trên tại đây
References:
https://www.tutorialspoint.com/spring/spring_beans_autowiring.htm
http://www.mkyong.com/spring/spring-auto-wiring-beans-in-xml/
