Code ví dụ Spring Boot – Spring Data Elasticsearch (ElasticsearchTemplate, ElasticsearchRepository).
(Xem lại: Hướng dẫn Elasticsearch)
Các công nghệ sử dụng:
Khởi tạo Index, Type Elasticsearch
Khi Spring Data kết nối tới Elasticsearch, nếu các Index, Type tương ứng chưa tồn tại thì nó sẽ tự động được tạo mới. Do đó chúng ta chỉ cần khởi động Elasticsearch trước khi chạy project là được.
Code ví dụ
Ở bài này mình sẽ tạo ví dụ thêm, sửa, xóa, lấy dữ liệu từ Elasticsearch.
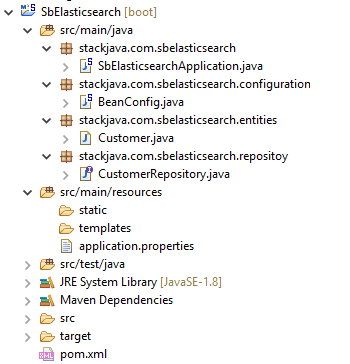
Cấu trúc Project
File cấu hình Spring Boot
Trong file cấu hình Spring Boot ta khai báo các thông tin kết nối tới Elasticsearch.
elasticsearch.clustername = stackjava-cluster
elasticsearch.host = localhost
elasticsearch.port = 9300
Để kiểm tra lại thông tin cluster bạn có thể dùng API GET _cluster/health
Phần port là port của node chứ không phải port của server Elasticsearch nhé, thông thường port Elasticsearch là 9200 còn port của node là 9300 để kiểm tra lại thông tin node bạn có thể dùng API GET /_nodes
(Xem lại: Cấu hình Elasticsearch)
File entities
package stackjava.com.sbelasticsearch.entities;

import org.springframework.data.annotation.Id;
import org.springframework.data.elasticsearch.annotations.Document;

@Document(indexName = "stackjava", type = "customer")
public class Customer {

  @Id
  private String id;
  private String name;
  private String address;

  // getter - setter
}
- Annotation
@Documenttương tự như annotation@Tablekhi làm việc với JPA, nó sẽ thực hiện mapping class với index, type tương ứng, ví dụ ở đây sẽ mapping với typecustomercủa indexstackjava - Annotation
@Idđánh dấu khóa chính, nếu bạn không truyền id lúc insert thì nó sẽ tự động tạo id cho bạn.
File Repository
package stackjava.com.sbelasticsearch.repositoy;

import java.util.List;

import org.springframework.data.elasticsearch.repository.ElasticsearchRepository;
import org.springframework.stereotype.Repository;

import stackjava.com.sbelasticsearch.entities.Customer;

@Repository
public interface CustomerRepository extends ElasticsearchRepository<Customer, String>{

  List<Customer> findByName(String name);

}
Phần repository sẽ sử dụng Spring Data, ở đây mình thừa kế ElasticsearchRepository.
ElasticsearchRepositorygiống với JpaRepository (database sql) hay MongoRepository (database mongodb) nó cũng định nghĩa sẵn các method như findAll, findById, remove, save… và cũng hỗ trợ cả Query Creation
File cấu hình bean
package stackjava.com.sbelasticsearch.configuration;

import java.net.InetAddress;

import org.elasticsearch.client.Client;
import org.elasticsearch.client.transport.TransportClient;
import org.elasticsearch.common.settings.Settings;
import org.elasticsearch.common.transport.InetSocketTransportAddress;
import org.elasticsearch.transport.client.PreBuiltTransportClient;
import org.springframework.beans.factory.annotation.Value;
import org.springframework.context.annotation.Bean;
import org.springframework.context.annotation.Configuration;
import org.springframework.data.elasticsearch.core.ElasticsearchOperations;
import org.springframework.data.elasticsearch.core.ElasticsearchTemplate;
import org.springframework.data.elasticsearch.repository.config.EnableElasticsearchRepositories;

@Configuration
@EnableElasticsearchRepositories(basePackages = "stackjava.com.sbelasticsearch.repositoy")
public class BeanConfig {

    @Value("${elasticsearch.host}")
    private String esHost;

    @Value("${elasticsearch.port}")
    private int esPort;

    @Value("${elasticsearch.clustername}")
    private String esClusterName;

    @Bean
    public Client client() throws Exception {
        Settings esSettings = Settings.builder()
        		.put("client.transport.sniff", true)
                .put("cluster.name", esClusterName)
                .build();

       TransportClient client = new PreBuiltTransportClient(esSettings);
       client.addTransportAddress(new InetSocketTransportAddress(InetAddress.getByName(esHost), esPort));
       return client;
    }

    @Bean
    public ElasticsearchOperations elasticsearchTemplate() throws Exception {
        return new ElasticsearchTemplate(client());
    }
}
Để sử dụng ElasticsearchRepository thì bạn cần phải định nghĩa bean ElasticsearchTemplate và apply bean này cho các class ElasticsearchRepository
Ở đây mình sẽ tạo các bean từ thông tin trong file application.properties
Trong bài tới mình sẽ hướng dẫn sử dụng spring-data-jest, nó sẽ tự động cấu hình các thông tin này, ta chỉ cần khai báo uri kết nối tới elasticsearch là được.
(Code ví dụ Spring Data Jest – Elasticsearch)
File chạy, demo
package stackjava.com.sbelasticsearch;

import org.springframework.boot.SpringApplication;
import org.springframework.boot.autoconfigure.SpringBootApplication;
import org.springframework.context.ApplicationContext;

import stackjava.com.sbelasticsearch.entities.Customer;
import stackjava.com.sbelasticsearch.repositoy.CustomerRepository;

@SpringBootApplication
public class SbElasticsearchApplication {

  public static void main(String[] args) {
    ApplicationContext context = SpringApplication.run(SbElasticsearchApplication.class, args);
    CustomerRepository customerRepository = context.getBean(CustomerRepository.class);

    System.out.println("---------- Demo  insert ----------------");
    Customer customer = new Customer();
    customer.setName("sena");
    customer.setAddress("ha noi");
    customerRepository.save(customer);
    Customer customer2 = new Customer();
    customer2.setId("1");
    customer2.setName("kai");
    customer2.setAddress("london");
    customerRepository.save(customer2);
    System.out.println("saved!");

    System.out.println("---------- Demo  findAll ----------------");
    customerRepository.findAll().forEach(c -> System.out.println(c));

    System.out.println("\n---------- Demo  find name = 'sena' ----------------");
    customerRepository.findByName("sena").forEach(c -> System.out.println(c));

    System.out.println("\n---------- Demo  delete id = '1' ----------------");
    Customer customerDelete = customerRepository.findById("1").orElse(null);
    if (customerDelete != null) {
      customerRepository.delete(customerDelete);
    }
    System.out.println("Deleted!");

    System.out.println("\n---------- Demo  findAll after delete ----------------");
    customerRepository.findAll().forEach(c -> System.out.println(c));

  }
}
Kết quả:
---------- Demo  insert ----------------
saved!
---------- Demo  findAll ----------------
Customer [id=Staj02UBCV3mCWTnCw3N, name=sena, address=ha noi]
Customer [id=1, name=kai, address=london]

---------- Demo  find name = 'sena' ----------------
Customer [id=Staj02UBCV3mCWTnCw3N, name=sena, address=ha noi]

---------- Demo  delete id = '1' ----------------
Deleted!

---------- Demo  findAll after delete ----------------
Customer [id=Staj02UBCV3mCWTnCw3N, name=sena, address=ha noi]
Chạy lệnh curl localhost:9200/stackjava/customer/_search?pretty để xác nhận lại dữ liệu trong elasticsearch
Okay, Done!
Download code ví dụ trên tại đây.
References:
https://docs.spring.io/…/elasticsearch


